An appetite is something that we take for granted.
When we don't have an appetite because of sickness, nervousness, busy-ness or other reasons, eating is often the last thing on our mind. As a person who loves food, when there is no appetite, it is a sad day. As a person who has a tendency to get low blood sugar, when there is no appetite, it is a major affliction. A situation that confuses me to my core is that when we are at our weakest, why are we not able to ingest the one thing that we need to re-fuel?
The past two weeks, I have experienced a lack of appetite like never before. I'm sure there are many people who experience this type of lack of food, but for me it was a first. So what do we do when we don't feel well, when we are so busy we don't have time, when we are so stressed we just don't feel like it? But yet, we don't have the energy, strength, time, money or tastebuds to continue?
I pray.
Where else does strength come from? Food is supposed to provide our bodies with nutrients, help us rebuild our cells, and energize us from within. Even Jesus was hungry after 40 days and nights of fasting (Matthew 4:2). So when our stomaches are empty or our body is trying to heal, I think of Jesus' words when he was tempted with food in the desert:
Jesus answered, “It is written: ‘Man shall not live on bread alone, but on every word that comes from the mouth of God.’
And boy is that true. Although I believe we really do need nutrients to keep us alive, I also believe when we are unable to do what we need to, God's strength can step in. If it is God's plan to keep us alive or to use us as a testimony, then He will provide us with the strength we need.
SO what does this post have to do with my purpose of this blog? Why am I not posting a recipe? I haven't been much of a motivated blogger lately and felt the need to post something. But I also haven't been much of a cook for two reasons. First, I haven't had the time. Second, to prep for the crazy month of March and all that it entails for me, I prepped several quick meals to put in the freezer and to make ahead of time to help my sanity and my husband who cannot cook (unless you want a fantastic grilled cheese sandwich every night). As the woman of the house who has the ability to cook, I want to make sure he is taken care of for meals so he can still eat as healthy as possible. I think part of the reason we are still living in a small apartment and don't have pets is due to the traveling and time we occasionally spend away. Sometimes, this is just how life goes. For many people, this is how every day of the year goes.
And it's okay. Because you do what is best for your family, your children, and for you. And when you just can't find the strength, the time, the motivation to cook or eat, there is always someone you can turn to for that strength.
Monday, March 21, 2016

Monday, February 8, 2016
Heart Shaped Raspberry Rolls
So, coming up is the dreaded Valentines Day. Yes, I said dreaded. I have never been a fan, even when my husband and I were dating. I believe Valentines Day should be every day, and it can make young people act funny just to feel like they fit in on this day. Since being married, I have to say I've softened quite a bit, but still don't care about all the mushy stuff.
 However, now that I am cooking more, I wanted to surprise him and do something special. So when ideas started coming out on Pinterest and Facebook, I looked through them and realized most of them required food coloring or some type of heart-shaped cookie cutter. Living in a small apartment, I barely have room for Christmas cookie cutters, never mind heart-shaped ones that I will probably only use 1 time ever. I may also just be so stubborn that I refuse to buy something for this holiday. So I kept looking until I found this recipe that did not require anything special! In fact, almost every single ingredient is already in my kitchen. It was a bit difficult to follow, but I had a lot of fun doing it, so this blog will include lots of pictures!
 The recipe calls for use of a stand mixer and the dough attachment. Of course this is something I do not have, not only because of the price tag, but the lack of room to keep it really anywhere. But my handy little sunbeam hand mixer did come with the dough hook set as do most hand mixers now-a-days. So I used the dough hook, and attempted to mix the dough so that it made one lump (or as close to that as I could).


 However, now that I am cooking more, I wanted to surprise him and do something special. So when ideas started coming out on Pinterest and Facebook, I looked through them and realized most of them required food coloring or some type of heart-shaped cookie cutter. Living in a small apartment, I barely have room for Christmas cookie cutters, never mind heart-shaped ones that I will probably only use 1 time ever. I may also just be so stubborn that I refuse to buy something for this holiday. So I kept looking until I found this recipe that did not require anything special! In fact, almost every single ingredient is already in my kitchen. It was a bit difficult to follow, but I had a lot of fun doing it, so this blog will include lots of pictures!

I then kneaded it together only enough to make it 1 lump and let it rest for 10 minutes.

As I let the dough rest, I put together the raspberries (I used 12 oz. instead of the 10 oz. it calls for), sugar, cornstarch and orange zest (orange peel).

I then rolled out the dough and compared it to a 9x13 pan to get the 9x15 size the recipe calls for. I did make it a bit bigger than called for because the dough was still quite thick and, honestly, who cares if you make more than it calls for!

The berries did not spread out very evenly, but I just made sure it was approximate. I kept it away from the edges as the picture on the website shows that the ends curl inward a bit which I tried to mirror (whether or not it worked, you can decide for yourself haha!).

Roll up each edge halfway until they meet in the middle. Note: they did not stick together when I pressed them together lightly, but it's alright. As long as they end up close in the pan, they will cook and rise to end up together.

I cut the ends and then cut the rest into 10 pieces (I could mark the dough to make sure they were all even!


Then I took each piece, laid it flat, and formed that heart shape with my hands! If you would like to put something down between the counter and rolls, try a small piece of parchment paper.

I used two pans, partially because I refused to waste the ends that would make a beautiful cannoli-shaped pastry.

When the pastries were almost done, I heated up some left-over chocolate chip morsels from my christmas baking to make a chocolate drizzle and dipping sauce.

The final product looked a bit messy and required a spatula to remove it from the pan without all the filling falling out. I chocolate all the pastries right in the pan so that I could use up the chocolate before it hardened and make the mess in the pan.

These were very cute, delicious desserts! The only feedback I had from Derek was that the raspberries were a bit sour, so he might prefer strawberries, and I agree! With the raspberries, you also get lots of seeds to crunch. So I think it's really a matter of preference. I do believe raspberries go better with chocolate, but you also don't have to use the chocolate!
Because it is just the two of us, I was a bit worried about re-heating these days later. I have to say, I was just as impressed as when they were fresh! Heating them for 30 seconds warms and softens the dough and heats the berries. It also melts the chocolate on top to make it glisten! So if you enjoy these, you can do so for several days.
I hope this is an idea if you want to do something special for your special someone, but don't have the tools or room to do so.
Heart Shaped Raspberry Rolls
Dough
1 cup lukewarm whole milk
1/3 cup lukewarm water
1 package instant yeast
3 Tbsp sugar
3 1/2 cups all-purpose flour
Filling
1 10-oz (or more) package frozen raspberries
1/3 cup sugar
1 tsp fresh orange zest
Icing
1/3 cup hazelnut spread or any chocolate morsels
1. Preheat oven to 350 degrees.
2. For dough: In the bowl of a stand mixer fitted with the dough hook, add all the dough ingredients and stir until combined. Turn mixer on medium speed and knead for 5 minutes, or until smooth. Remove dough to a floured work surface, cover, and let rest for 10 minutes.
3. For the filling: In a medium bowl, toss frozen raspberries with sugar, cornstarch and orange zest.
4. After dough has rested, use a floured rolling pin to roll it out into a 9 by 15-inch rectangle. Spread evenly with raspberry mixture. Starting on the long side, tightly roll dough up, stopping at center. Roll the other side up, stopping when two sides meet at the middle. Gently press together.
5. Place in greased pie pan or 9x13 inch baking pan, with points towards the center. Bake for about 25 minutes, or until lightly golden brown. Let cool on a wire rack for at least 5 minutes.
6. For the icing: While rolls cool, place chocolate hazelnut spread into a zip top bag and cut a small hole in one corner. Drizzle spread over rolls just before serving.
Thursday, January 28, 2016
Philly Cheesesteak Cups
This recipe has gone around the internet quite a bit, and is something that Derek and I both like, so I thought I'd try it out! I had lots of websites to choose from, but here's where I got my recipe. And, yes, I know I'm just adding to that pile of websites, but that's what blogs are for, right? You can pick and choose! No hard feelings if you pick another website, either. I do the same thing all the time.
This is a rather easy recipe to put together and doesn't require a ton of prep.

The recipe said to slice the meat thin, but how thin is thin? I thought mine would have been thin and small enough, but when I was ready to combine the meat with the veggies, I realized these pieces might not fit nicely in the cups. So I cut them up in the pan after they were cooked.

One mistake I made in prepping for this meal was forgetting the heavy cream. I make about 4 meals a year that require heavy cream so rarely do I have some in the fridge, and just passed over it for my grocery list. So I quickly googled substitutions and found a helpful substitution with things I already have. I am big about prepping as much before I need it as possible. So I got the heavy cream substitution ready while the meat and veggies were cooking, but discovered something I didn't read about online for this substitution.
 I cut the pastry to approximately 3x3 squares and they fit perfectly in my muffin tin. I had quite a few extra squares left over, so I decided to add a bit of crust onto a few just for fun.
These were delicious cups that were also quite filling!

*Update: Because it is just the two of us, we had leftovers for the next few nights. I will say I am not a big fan of deflated pastry puff. So this meal might be best when you will have guests and can show off your creativity, and not have leftovers!
I still had 3 squares left over, so I decided to get creative and made a small and easy dessert. I just took some candy and stuffed it in the squares and baked it for about 10 minutes, just enough to melt the chocolate and make the pastry golden. It was a delicious dessert!

I hope you can enjoy these Philly Cheesesteak cups just as much as we did! And treat yourself to a delicious dessert, too!
Philly Cheesecake Cups
This is a rather easy recipe to put together and doesn't require a ton of prep.

The recipe said to slice the meat thin, but how thin is thin? I thought mine would have been thin and small enough, but when I was ready to combine the meat with the veggies, I realized these pieces might not fit nicely in the cups. So I cut them up in the pan after they were cooked.

 |
| I also added some left-over chicken! |

These were delicious cups that were also quite filling!

*Update: Because it is just the two of us, we had leftovers for the next few nights. I will say I am not a big fan of deflated pastry puff. So this meal might be best when you will have guests and can show off your creativity, and not have leftovers!
I still had 3 squares left over, so I decided to get creative and made a small and easy dessert. I just took some candy and stuffed it in the squares and baked it for about 10 minutes, just enough to melt the chocolate and make the pastry golden. It was a delicious dessert!

I hope you can enjoy these Philly Cheesesteak cups just as much as we did! And treat yourself to a delicious dessert, too!
Philly Cheesecake Cups
- 1 lb rib eye steak, thinly sliced (if you want to save a little money, use flank steak EXTREMELY thinly sliced, or use ground beef)
- 1 tablespoon olive oil
- ½ medium onion, chopped
- 1 green pepper, chopped
- 1 cup mushroom, chopped
- ½ teaspoon salt
- ¼ teaspoon garlic powder
- ¼ teaspoon pepper
- ⅓ cup heavy cream
- ⅓ cup milk
- 1 package puff pastry, thawed
- ½ cup provolone cheese, grated
1. Preheat oven to 400 degrees.
2. Preheat skillet and oil. Add chopped onion and peppers and sauté for approximately 5 minutes. Add mushrooms and sauté for another 5 minutes. Set aside.
3. Cook beef in the same skillet until no longer pink. Add the veggie mixture back to the pan.
4. Add seasonings, cream and milk. Bring to a boil and stir until thickened. Remove from heat.
5. Spray a muffin tin with non-stick cooking spray. Cut pastry to 3-4 inch squares and place each one in muffin cup. Add about 1/4 cup cheesesteak mix to each cup.
6. Bake for about 10 minutes. Place a small bunch of provolone cheese on each cheesesteak cup and continue to bake for another 3 minutes or so.
Wednesday, January 13, 2016
Cookbooks of Meaning
I don't know about you, but the holidays did me in when it came to meal prep and cooking. With all the family meals between Christmas and New Years, I've been struggling to keep up and have food in the house since then! While I doubt that I'm still in a food coma, I am still struggling to get back into the swing of things. So I thought I'd share a special project that I did for the holiday that is near and dear to my heart.

 Like many people, my grandmother was a huge influence in the kitchen to my mother, and also to me. She is the one that always made an incredible Christmas dinner. I will never forget the days of applesauce-making, corn-peeling, ice-cream making, pie-baking, and hours and hours in the kitchen. My mother inherited her skills, passion for cooking and the ability to feed an army when it's just our small family (literally!), and I'd like to think I inherited most of these qualities from my mom. My mom has made so many of her recipes over the years that we've loved and I brought with me and am now sharing with my husband and his family.
Now that my grandma is gone, my mom had her recipe boxes and access to the Mennonite Community Cookbook she often used. For Christmas, which my mom was hosting this year, she wanted to honor my grandma by compiling some of her best known recipes and distribute to the family for their keeping.
It started out as a word document, just typing up all the recipe cards that my mom picked out. I also typed out the recipes from the Mennonite Community Cookbook and labeled the source. But I didn't want this to just be a binder of paper. I wanted it to be durable and special to last generations. So I took it upon myself to surprise my mom and get the recipes made into a cookbook.
I searched online for how to make your own cookbook and came across the website Heritage Cookbook. From the research I did, it had some of the cheapest prices per page, and the ones displayed on their website looked amazing! The only downside to deciding to do this so late was that I had to copy and paste all the recipes from the Word document into the website 1 by 1. If I knew I was doing this from the beginning, I would have avoided the copy-and-paste step completely.
There were many covers to choose from, but none that caught my eye to represent my grandma. So a great aspect of this website is that you can make your own on this website. So I googled some cookbook covers and found a fun, but symbolic cover and was able to edit it in Word and on their website. I'd say the cover was the hardest part to do, but was worth it.
The last step I did to make it more personable was to scan some pictures of grandma, grandpa and the family to add throughout the cookbook. To me, this made it something to be passed down to my kids so they can see their grandparents (my mother) with the family.

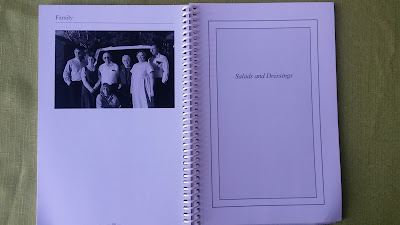 My mom didn't know I was doing this special cookbook until she opened them on Christmas. She only knew I'd have them ready to hand out to the family. This was not only a gift from my mom to the family, but from me to myself so that I will have a special book to continue the traditional family food for generations. And it's already got some grease stains on the cookie pages from my big cookie extravaganza!

My prayer is that I can bless my family with the food God continues to provide just as my grandma showed her love by providing for her family. I hope if this is something you can do with recipes from a loved one, that you enjoy it and can honor a family or friend by doing this for them, too.

 Like many people, my grandmother was a huge influence in the kitchen to my mother, and also to me. She is the one that always made an incredible Christmas dinner. I will never forget the days of applesauce-making, corn-peeling, ice-cream making, pie-baking, and hours and hours in the kitchen. My mother inherited her skills, passion for cooking and the ability to feed an army when it's just our small family (literally!), and I'd like to think I inherited most of these qualities from my mom. My mom has made so many of her recipes over the years that we've loved and I brought with me and am now sharing with my husband and his family.
Now that my grandma is gone, my mom had her recipe boxes and access to the Mennonite Community Cookbook she often used. For Christmas, which my mom was hosting this year, she wanted to honor my grandma by compiling some of her best known recipes and distribute to the family for their keeping.
It started out as a word document, just typing up all the recipe cards that my mom picked out. I also typed out the recipes from the Mennonite Community Cookbook and labeled the source. But I didn't want this to just be a binder of paper. I wanted it to be durable and special to last generations. So I took it upon myself to surprise my mom and get the recipes made into a cookbook.
I searched online for how to make your own cookbook and came across the website Heritage Cookbook. From the research I did, it had some of the cheapest prices per page, and the ones displayed on their website looked amazing! The only downside to deciding to do this so late was that I had to copy and paste all the recipes from the Word document into the website 1 by 1. If I knew I was doing this from the beginning, I would have avoided the copy-and-paste step completely.
There were many covers to choose from, but none that caught my eye to represent my grandma. So a great aspect of this website is that you can make your own on this website. So I googled some cookbook covers and found a fun, but symbolic cover and was able to edit it in Word and on their website. I'd say the cover was the hardest part to do, but was worth it.
The last step I did to make it more personable was to scan some pictures of grandma, grandpa and the family to add throughout the cookbook. To me, this made it something to be passed down to my kids so they can see their grandparents (my mother) with the family.


My prayer is that I can bless my family with the food God continues to provide just as my grandma showed her love by providing for her family. I hope if this is something you can do with recipes from a loved one, that you enjoy it and can honor a family or friend by doing this for them, too.
Monday, December 21, 2015
Cookie Dough: Chilled and Drop vs. Roll-out
Tis the season for christmas cookies! My family has a long history of my grandma in the kitchen baking hundreds of cookies for our family christmas, and then to freeze for year-round goodness. Our family favorites aren't the typical oatmeal raisin, peanut butter blossoms and candy canes. The family favorites include Pineapple Cookies, Carrot Cookies, Sand Tarts (roll out cookies you can decorate, but not sugar cookies) and Grandpa's Cookies. These are all recipes from the Mennonite Community Cookbook that my grandma used heavily. While I never baked cookies with my grandma (that I know of), I love the feeling that we are carrying on her legacy each year and I am proud to be able to bring a piece of her to our family christmas each year.
This year, I wanted to take on the responsibility to make the cookies for our family christmas. I have made all of the cookies before at my mom's house in past years, but this was the first year to do it on my own. In the first and last batch of cookies, I ran into a question and was encouraged to experiment!
My first question: Do I let chilled dough come to room temperature before baking?
Answer: No, but it's okay if I do for this cookie.
For this experiment, I made Grandpa's Cookies. The dough of my first batch that I chilled was soft enough to scoop right away after being in the refrigerator for over 12 hours. But I wanted to do some research into whether it would make a big difference.
To make a long story short, it only made a difference in how fast it browned, but this may have been an operator's error (I never said I was a perfect cook!). The only other difference was noticed in the presentation of the flattened vs. not flattened pan where the flattened cookies looked more uniform and smooth. Take a look for yourself:
I also found this explanation (from King Arthur Flour) of why it is a good idea to chill cookie dough in the first place. In the comments section, a viewer asks a vary similar question, and the author notes that it is better to cook the dough right away so the fat stays cold.
"Chilling cookie dough before baking solidifies the fat in the cookies. As the cookies bake, the fat in the chilled cookie dough takes longer to melt than room-temperature fat. And the longer the fat remains solid, the less cookies spread."
In other words, if you don't want your cookies to spread, it's best to cook them right out of the fridge or freezer.
My second question: Can I use a roll-out recipe to make drop cookies instead?
My answer: Yes.
For this experiment, I made Sand Tart cookies. While I am a big fan of decorating cookies, I didn't have any decorating items such as sprinkles or icing. I was hesitant to buy some because I don't have any space to store it. I have a great cookie recipe for roll-outs, but would it still work if I didn't want to decorate them and make them a drop cookie instead? So I took a small bit of dough and instead of rolling them out, used an ice cream scoop to make some drop cookies.
They took over double the amount of time to cook than the rolled-out ones. I actually forgot about them so they got more brown than I wanted. Because they aren't a sugar cookie, they did taste a little bland. They also expanded and ended up mega-cookie size!
Moral of the experiment: Maybe test them by making a few as the recipe calls for first to see how much they expand and how long they truly take to bake. Then adjust by making smaller than usual drop cookies if they expand and prepare for them to cook longer because they are thicker.
I did end up buying some sprinkles and icing. I used up both tubes of icing which was perfect so I don't have to store them. Here are the delicious final product of the rolled-out cookies just for show.
If you are making cookies for the holidays, have fun with it! Let your creativity show. I hope you have a Merry Christmas and a Happy New Year!
This year, I wanted to take on the responsibility to make the cookies for our family christmas. I have made all of the cookies before at my mom's house in past years, but this was the first year to do it on my own. In the first and last batch of cookies, I ran into a question and was encouraged to experiment!
My first question: Do I let chilled dough come to room temperature before baking?
Answer: No, but it's okay if I do for this cookie.
For this experiment, I made Grandpa's Cookies. The dough of my first batch that I chilled was soft enough to scoop right away after being in the refrigerator for over 12 hours. But I wanted to do some research into whether it would make a big difference.
To make a long story short, it only made a difference in how fast it browned, but this may have been an operator's error (I never said I was a perfect cook!). The only other difference was noticed in the presentation of the flattened vs. not flattened pan where the flattened cookies looked more uniform and smooth. Take a look for yourself:
 |
| First batch (cold)- Left side: natural; Right side: flattened |
 |
| Last batch (room temp)- Left side: natural; Right side: flattened |
"Chilling cookie dough before baking solidifies the fat in the cookies. As the cookies bake, the fat in the chilled cookie dough takes longer to melt than room-temperature fat. And the longer the fat remains solid, the less cookies spread."
In other words, if you don't want your cookies to spread, it's best to cook them right out of the fridge or freezer.
My second question: Can I use a roll-out recipe to make drop cookies instead?
My answer: Yes.
For this experiment, I made Sand Tart cookies. While I am a big fan of decorating cookies, I didn't have any decorating items such as sprinkles or icing. I was hesitant to buy some because I don't have any space to store it. I have a great cookie recipe for roll-outs, but would it still work if I didn't want to decorate them and make them a drop cookie instead? So I took a small bit of dough and instead of rolling them out, used an ice cream scoop to make some drop cookies.
 |
| Finished drop cookies |
They took over double the amount of time to cook than the rolled-out ones. I actually forgot about them so they got more brown than I wanted. Because they aren't a sugar cookie, they did taste a little bland. They also expanded and ended up mega-cookie size!
Moral of the experiment: Maybe test them by making a few as the recipe calls for first to see how much they expand and how long they truly take to bake. Then adjust by making smaller than usual drop cookies if they expand and prepare for them to cook longer because they are thicker.
 |
| Finished roll-out cookies |
I did end up buying some sprinkles and icing. I used up both tubes of icing which was perfect so I don't have to store them. Here are the delicious final product of the rolled-out cookies just for show.
If you are making cookies for the holidays, have fun with it! Let your creativity show. I hope you have a Merry Christmas and a Happy New Year!
Monday, December 14, 2015
Hot Cocoa Gift Bags
I absolutely love the holidays and sharing the holiday spirit with others. While I believe we should be kind and loving every day, it seems extra easy during the holidays because it's everywhere.
Last year, our first Christmas season together as a married couple, I wanted to show my appreciation to some people who may not hear it a lot, or should hear it more. I wanted to give to people in the apartment office and maintenance, mailman, work managers and our neighbor.
I also love hot chocolate during the winter. I have tried many different flavors such as white hot chocolate, peppermint, dark chocolate, marshmallows and no marshmallows. I had run across a Cinnamon Hot Chocolate Mix on the Taste of Home website and had the idea to create little bags to hand out. I had so much fun with this and loved blessing others with the bags. Plus I made some extra for myself and thought it was just as good, if not better than the store bought packets, but way cheaper per serving!

This was such a simple and quick gift to put together. You can get as creative as your heart desires, and make it your own.

It's as simple as mixing the ingredients together. I mixed the marshmallows right in the cocoa mixture, but if you wanted to present it differently, you could leave them out and place them on top of the mixture in the bag as in the picture on the Taste of Home page linked above.
I bought adorable bags and used some ribbon to tie it together. This year I decided to include a candy cane as well. I also wanted to put a little tag on it to let them know it's a thank you/appreciation for all they do. Last year I made a tag, but lost it when my computer crashed. So this year I had to recreate it. I looked online for ideas of what to write, as I couldn't remember in the least what I wrote last year. I could not find any Christmas/thank you sayings or tags that were appropriate, so I want to give you a FREE downloadable tag in case you are in the same boat.
I hope you have fun blessing others with this fun and easy gift!
I'd love to hear if you come up with variations of this gift.
Cinnamon Hot Chocolate Mix
1 3/4 cups nonfat dry milk powder
1 cup confectioner's sugar
1/2 cup powdered nondairy creamer
1/2 cup baking cocoa
1/2 tsp ground cinnamon
1 cup miniature marshmallows
Additional Ingredients: 3/4 cup hot milk
In a large bowl, combine all ingredients and mix well. Store in an airtight container in a cool dry place for up to 3 months.
To prepare 1 serving: Dissolve 3 tablespoons of hot chocolate mix in hot milk.
Yield: about 3 1/2 cups mix (18 servings)
Last year, our first Christmas season together as a married couple, I wanted to show my appreciation to some people who may not hear it a lot, or should hear it more. I wanted to give to people in the apartment office and maintenance, mailman, work managers and our neighbor.
 |
| Last year's gift bags before I added ribbon and a tag |
I also love hot chocolate during the winter. I have tried many different flavors such as white hot chocolate, peppermint, dark chocolate, marshmallows and no marshmallows. I had run across a Cinnamon Hot Chocolate Mix on the Taste of Home website and had the idea to create little bags to hand out. I had so much fun with this and loved blessing others with the bags. Plus I made some extra for myself and thought it was just as good, if not better than the store bought packets, but way cheaper per serving!

This was such a simple and quick gift to put together. You can get as creative as your heart desires, and make it your own.

It's as simple as mixing the ingredients together. I mixed the marshmallows right in the cocoa mixture, but if you wanted to present it differently, you could leave them out and place them on top of the mixture in the bag as in the picture on the Taste of Home page linked above.
I bought adorable bags and used some ribbon to tie it together. This year I decided to include a candy cane as well. I also wanted to put a little tag on it to let them know it's a thank you/appreciation for all they do. Last year I made a tag, but lost it when my computer crashed. So this year I had to recreate it. I looked online for ideas of what to write, as I couldn't remember in the least what I wrote last year. I could not find any Christmas/thank you sayings or tags that were appropriate, so I want to give you a FREE downloadable tag in case you are in the same boat.
 |
| This year's finished gift bags |
I'd love to hear if you come up with variations of this gift.
Cinnamon Hot Chocolate Mix
1 3/4 cups nonfat dry milk powder
1 cup confectioner's sugar
1/2 cup powdered nondairy creamer
1/2 cup baking cocoa
1/2 tsp ground cinnamon
1 cup miniature marshmallows
Additional Ingredients: 3/4 cup hot milk
In a large bowl, combine all ingredients and mix well. Store in an airtight container in a cool dry place for up to 3 months.
To prepare 1 serving: Dissolve 3 tablespoons of hot chocolate mix in hot milk.
Yield: about 3 1/2 cups mix (18 servings)
Wednesday, December 2, 2015
Christmas Wall Tree
Our first year in the apartment, I realized the small apartment was not good for one thing. Christmas decorations. We already had every surface space covered with picture frames, coasters, books, or plants. We had all the decorations up that we wanted, and did not want to drill more holes just for Christmas that would be vacant the rest of the year.
I've always loved the Christmas tree at my mom's house, because it was something I put thought into while decorating. I even made a ribbon bow (instead of a star or angel on top) in high school that had strips of ribbon cascading down the sides of the tree, making it elegant, but still very home-y.
 In determination to make our place feel at home and in the Christmas spirit, I found a solution to our 'no room for a tree' problem. I saw this website on pinterest, specifically the light tree, and attempted to replicate it.
This is now our second year using the light tree, and while a 3-D tree is preferable, I couldn't ask for a better alternative.
I didn't even think about making this a tutorial until after it was already up, but found a creative way to share how I did it for those who don't want to spend the time figuring out how to do it.
For a reference, My tree is 5 feet tall and 3 feet, 5 inches at its widest.
Christmas Tree Wall tutorial
The hardest part is honestly my perfectionism to make it look not too fat, have straight lines, and fill empty spaces. But that's just a personal problem!
When I posted my completed project on Facebook, I also heard an idea for families with children. A mother drew a tree outline on a large piece of paper and had the children color in the ornaments!
So I hope this helps anyone who loves Christmas decorations, but doesn't have the floor space for a tree.
Note: I can still pull out the drawers to the drawers you see in the picture, I just have to be careful. And presents fit underneath it!
I've always loved the Christmas tree at my mom's house, because it was something I put thought into while decorating. I even made a ribbon bow (instead of a star or angel on top) in high school that had strips of ribbon cascading down the sides of the tree, making it elegant, but still very home-y.

This is now our second year using the light tree, and while a 3-D tree is preferable, I couldn't ask for a better alternative.
I didn't even think about making this a tutorial until after it was already up, but found a creative way to share how I did it for those who don't want to spend the time figuring out how to do it.
For a reference, My tree is 5 feet tall and 3 feet, 5 inches at its widest.
Christmas Tree Wall tutorial
The hardest part is honestly my perfectionism to make it look not too fat, have straight lines, and fill empty spaces. But that's just a personal problem!
When I posted my completed project on Facebook, I also heard an idea for families with children. A mother drew a tree outline on a large piece of paper and had the children color in the ornaments!
So I hope this helps anyone who loves Christmas decorations, but doesn't have the floor space for a tree.
Note: I can still pull out the drawers to the drawers you see in the picture, I just have to be careful. And presents fit underneath it!
Subscribe to:
Posts (Atom)